{"@id":"cedric-dumont.com"}
IdentityServer.v3, MembershipReboot, AngularJs, WebApi 2 and MVC : Mix It ! : Part 1
This article is part of a seriesdealing with IdentityServer.v3 authentication and authorization.
This Part deals with IdentityServer.V3 installation and configuration using MemberShipReboot as the undelying account repository. We will also add BrockAllen's IdentityManager for admin purposes.
Step 1 : Create the web project
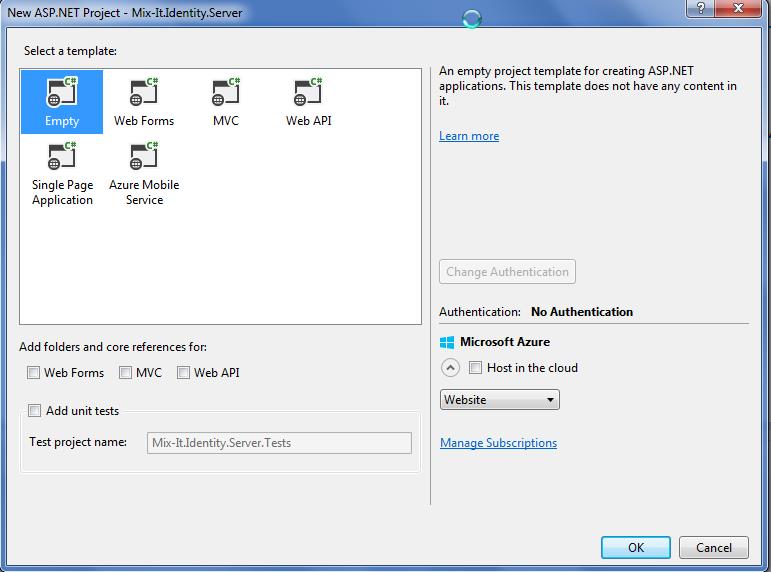
start visual studio and create an empty web project
Step 2 : add the Dependencies
Add the following Nuget packages ( some of them are in pre realease, so if you use Nuget UI tool, check that 'prerelease' is selected in the checkbox.)
For identity server
install-package Microsoft.Owin.Host.Systemweb install-package Thinktecture.IdentityServer.v3 -pre
for use with membershipreboot
install-package Thinktecture.IdentityServer.v3.MembershipReboot -pre
for use of Identity Manager
install-package Thinktecture.IdentityManager.MembershipReboot - pre Install-Package BrockAllen.MembershipReboot.Ef
Step 3: Create a self signed certificate.
Checkthis post for the long story
simply create a cmd file with the following content:
makecert.exe ^
-n "CN=MixItCARoot" ^
-r ^
-pe ^
-a sha512 ^
-len 4096 ^
-cy authority ^
-sv MixItTest.pvk ^
IdentitySrvCAROOT.cer

pvk2pfx.exe ^
-pvk MixItTest.pvk ^
-spc MixItTest.cer ^
-pfx MixItTest.pfx ^
-po IAmAPassword
on line 2 you have to specify a CA Root (choose whatever example : 'DevRoot') and line 15 a password (here : IAmAPassword).
open a visual studio command prompt. (for me it was located here : C:\Program Files (x86)\Microsoft Visual Studio 12.0\Common7\Tools\Shortcuts , but really depends on your installation) and execute your command file. This will create 3 files. (a .cer for the certificate, a .pvk which is the private key and a .pfx which contains both)
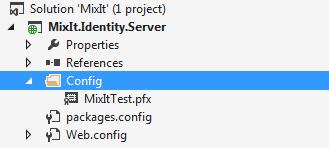
Create a Config folder in your solution and copy the YourCertFileName.pfx over there. (here MixItTest.pfx)
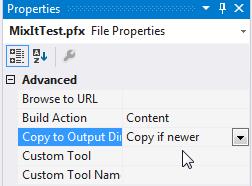
On the properties of the pfx file, set The Copy to Output Dir to 'Copy if newer'
Step 4 : Create the Configuration classes.
In this step we will create a Clients.cs class that will hold our Client and a Scopes.cs class that will hold our InMemory Scope Objects. (these could come from a database or another repository.)
For the Users, we will use a MemberShipReboot repository.
Below is the Clients.cs listing that contains a single Client for now. It uses the Resource Owner flow.
[code language="csharp"]
namespace MixIt.Identity.Server.Config
{
public static class Clients
{
public static IEnumerable
                ClientId = "IdentityWebUI",
                ClientSecret = "secret",

                Flow = Flows.ResourceOwner,
                AccessTokenType = AccessTokenType.Jwt,
                AccessTokenLifetime = 3600

            }
        };
    }
}
} [/code]
The Scopes.cs contains the scopes for our application. for now there are the standard scope (openid...) and a scope that we defined to access our public api (we will create it later).
namespace MixIt.Identity.Server.Config
{
    public static class Scopes
    {
        public static IEnumerable<Scope> Get()
        {
            var scopes = new List<Scope>
            {
                new Scope
                {
                    Enabled = true,
                    Name = "publicApi",
                    Description = "Access to our public API",
                    Type = ScopeType.Resource
                }
            };

            scopes.AddRange(StandardScopes.All);

            return scopes;
        }
    }
}
add a MemberShip Reboot User Service:
 public class MembershipRebootUserServiceFactory
    {
        public static IUserService Factory(string connString)
        {
            var db = new DefaultMembershipRebootDatabase(connString);
            var repo = new DefaultUserAccountRepository(db);
            var userAccountService = new UserAccountService(config, repo);
            var userSvc = new MembershipRebootUserService<UserAccount>(userAccountService, db);
            return userSvc;
        }

        static MembershipRebootConfiguration config;
        static MembershipRebootUserServiceFactory()
        {
            System.Data.Entity.Database.SetInitializer(new System.Data.Entity.MigrateDatabaseToLatestVersion<DefaultMembershipRebootDatabase, BrockAllen.MembershipReboot.Ef.Migrations.Configuration>());

            config = new MembershipRebootConfiguration();
            config.PasswordHashingIterationCount = 50000;
            config.AllowLoginAfterAccountCreation = true;
            config.RequireAccountVerification = false;
        }
    }
and a Factory.cs class to configure all stores and services (here : scopes, clients and users)
  public class Factory
    {
        public static IdentityServerServiceFactory Configure(string connString)
        {
            var factory = new IdentityServerServiceFactory();

            factory.UserService =
                new Registration<IUserService>(resolver => MembershipRebootUserServiceFactory.Factory(connString));

            var scopeStore = new InMemoryScopeStore(Scopes.Get());
            factory.ScopeStore = new Registration<IScopeStore>(resolver => scopeStore);

            var clientStore = new InMemoryClientStore(Clients.Get());
            factory.ClientStore = new Registration<IClientStore>(resolver => clientStore);

            return factory;
        }
    }
Step 5 : Glue it with the Startup.cs
public class Startup
    {
        public void Configuration(IAppBuilder app)
        {
            app.Map("/identity", idsrvApp =>
            {
                idsrvApp.UseIdentityServer(new IdentityServerOptions
                {
                    SiteName = "Identity Server",
                    IssuerUri = "https://idsrv3/mixit",
                    SigningCertificate = LoadCertificate(),

                    Factory = Factory.Configure("MyIdentityDb"),

                    CorsPolicy = CorsPolicy.AllowAll
                });
            });

        }

        X509Certificate2 LoadCertificate()
        {
            return new X509Certificate2(
                string.Format(@"{0}\bin\Config\MixItTest.pfx", AppDomain.CurrentDomain.BaseDirectory), "IAmAPassword");
        }
    }
Step 6 : add configuration in the Web.config file
- add the RAMMFAR
<system.webServer>
    <modules runAllManagedModulesForAllRequests="true" />
</system.webServer>- add the connection string (for the membershipreboot repository)
 <connectionStrings>
    <add name="MyIdentityDb" connectionString="Data Source=(LocalDb)\v11.0;Initial Catalog=Identity;Integrated Security=True" providerName="System.Data.SqlClient" />
  </connectionStrings>
Step 7 : enable SSL
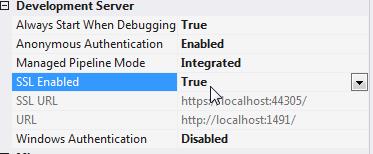
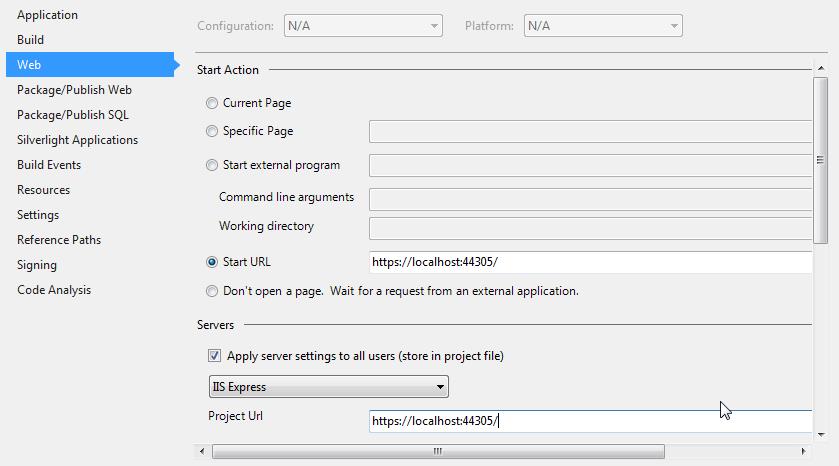
easy to do with visual studio in dev mode : set the property SSL Enabled to true:
then copy the SSL URL to the clipboard and right click on the project to open the properties. Click the 'Web' Tab and copy the ssl url to Start Url and Project URL .
Step 8 : Test it
At this point, you should have a running IdentityServer. Just run the project and check the following address (your port might be different than 44305:
https://localhost:44305/identity/.well-known/openid-configuration
the browser should display something like this:
Step 9 : configure IdentityManager.
Identity Manager is a tool created by BrockAllen to manage Identity (can be through MembershipReboot or Asp.net Identity). Here we deal with MembershipReboot. We will create a class to configure the IdentityManager (MembershipRebootIdentityManagerFactory.cs) then map it in the Startup.cs file. here is the class taken from the MembershipReboot samples:
namespace MixIt.Identity.Server.Config
{
    public class MembershipRebootIdentityManagerFactory
    {
        static MembershipRebootConfiguration<RelationalUserAccount> config;
        static MembershipRebootIdentityManagerFactory()
        {
            System.Data.Entity.Database.SetInitializer(new System.Data.Entity.MigrateDatabaseToLatestVersion<DefaultMembershipRebootDatabase, BrockAllen.MembershipReboot.Ef.Migrations.Configuration>());

            config = new MembershipRebootConfiguration<RelationalUserAccount>();
            config.PasswordHashingIterationCount = 5000;
            config.RequireAccountVerification = false;
        }

        string connString;
        public MembershipRebootIdentityManagerFactory(string connString)
        {
            this.connString = connString;
        }

        public IIdentityManagerService Create()
        {
            var db = new DefaultMembershipRebootDatabase(this.connString);
            var userrepo = new DefaultUserAccountRepository(db);
            var usersvc = new UserAccountService<RelationalUserAccount>(config, userrepo);

            var grprepo = new DefaultGroupRepository(db);
            var grpsvc = new GroupService<RelationalGroup>(config.DefaultTenant, grprepo);

            var svc = new MembershipRebootIdentityManagerService<RelationalUserAccount, RelationalGroup>(usersvc, userrepo, grpsvc, grprepo);
            return new DisposableIdentityManagerService(svc, db);
        }
    }
}
In the Startup.cs class add the following mapping
...
  app.Map("/admin", adminApp =>
            {
                var factory = new MembershipRebootIdentityManagerFactory("MyIdentityDb");
                adminApp.UseIdentityManager(new Thinktecture.IdentityManager.IdentityManagerConfiguration()
                {
                    IdentityManagerFactory = factory.Create
                });
            });

...
"MyIdentityDb" _ is the connection string that you configured in the _Web.config.
To test it go to the following address: https://localhost:44305/admin#/
you should see something like this:
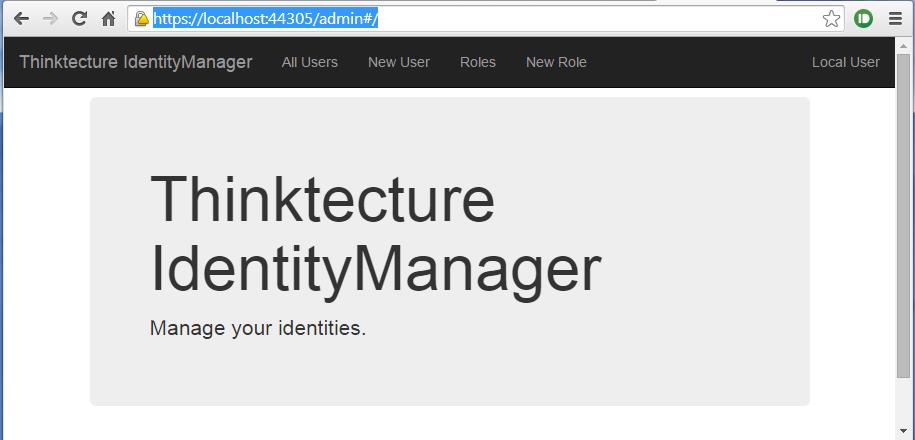
Try it and create a user 'test' for example. we will use 'Fiddler' to get a token using post requests with the Client that we have configured.
NB : the menus (All Users, Create new...) may take a moment to load.
Step 10 : Test IdentityServer with Fiddler
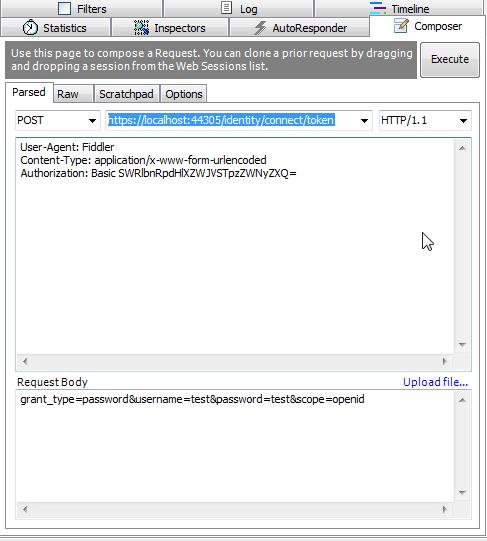
When you check the document received from https://localhost:44305/identity/.well-known/openid-configuration, you can see that the property tokenendpoint_ is set to : https://localhost:44305/identity/connect/token. We will use that endpoint to get a token. Therefor, just issue the following HTTP POST request to that endpoint:
-------------------
Post :
https://localhost:44305/identity/connect/token

Headers:
User-Agent: Fiddler
Content-Type: application/x-www-form-urlencoded
Authorization: Basic SWRlbnRpdHlXZWJVSTpzZWNyZXQ=

Body:
grant_type=password&username=test&password=tes5&scope=openid
------------------
(the string SWRlbnRpdHlXZWJVSTpzZWNyZXQ= comes from the Base64 encoding of IdentityWebUI:secret which is our clientId and client secret located in our Clients.cs file. I use the Fiddler text wizard to do that.)
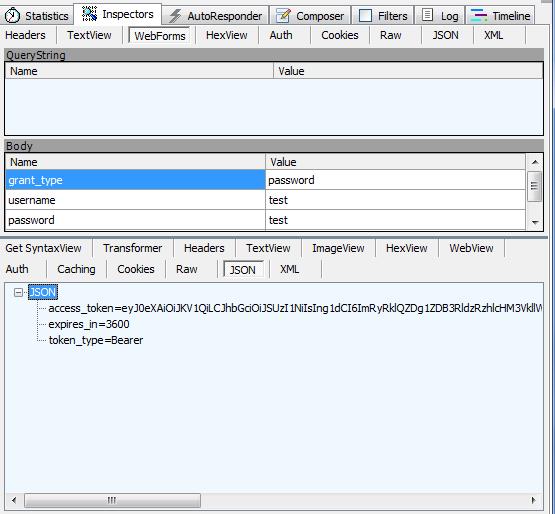
If you have created a user with username = 'test' and password ='test', then the result will give you an access token:
If you try with an incorrect password for example, you should receive the following:
{"error":"invalidgrant"}_
That's it ! in the next article, we will create the webapi that will be used to create a user using membershipreboot
As Usual, comments are welcome and even remarks to update this little documentation.
